Tuesday, November 22, 2011

Carmelized Red Onion & Fennel Quesadillas


I'm a big fan of not following the rules of food all the time.  There are reasons why ingredients for recipes typically come from the same style or genre, but that shouldn't prevent you from crossing borders and experimenting...that's how some of the best and most innovative recipes are born. 

If you decide to get brave and turn your kitchen into a laboratory, just be prepared for the reality that not all of your culinary experiments will likely be featured on the Food Network right away.  (Trust me, I have created many disasters as I have attempted to broaden my range.)  In fact, I am feeling quite generous tonight and will pass along 2 VERY valuable things I learned so as to prevent you from making similar mistakes:
  1. When cooking for people, you cannot cover up burned food by calling it "Cajun" unless you ACTUALLY know how to cook Cajun.
  2. Bananas have no place in Chinese cooking.
All that said, here's an example of something that could easily be considered a non-traditional quesadilla.  Quesadillas being a Mexican creation are well known for their versatility in ingredient options, and here is a recipe that utilizes more of a bistro-style prepared filling.  These taste fantastic, are cool to make, and are elegant enough (in my opinion) to serve before any meal or by themselves. 


Carmelized Red Onion & Fennel Quesadillas:
Ingredients:
  • 1 - Medium red onion, sliced thinly
  • 1 - Bulb of fennel, sliced thinly (Check out my blog on how to slice fennel if you're not familiar.)
  • 1/2 - Bottle of your favorite beer
  • 1 Tbsp. Olive Oil
  • 1 Tbsp. Butter
  • 1 Tsp. Sugar
  • 1# (16 oz) of either Montery Jack or Colby Jack shredded cheese (I highly recommend shredding your own - the quesadilla will be much creamier, but you most certainly can use a bagged version.)
  • 1 Package Tortillas - Burrito size
How To Make:
  • Slice the fennel and onion and set aside.  Heat the butter and oil in a medium saute' pan over medium heat until butter begins to melt.  Add your fennel and red onions and allow them to cook about 8 minutes until they begin to soften.  Add your sugar and stir mixture, continuing to cook 2-3 minutes.  Finally add your beer and cook, stirring occasionally for about 4 minutes until it reduces.  Transfer to a bowl and set aside.  (This mix can also be made up to 2 days ahead of time and refrigerated.).
  • If you're shredding your cheese yourself, shred it now and place in a bowl.
  • Heat a large pan on your stovetop over medium heat.  Place your tortilla down flat in the pan and spoon some of the cheese over 1/2 of it followed by some of the onion/fennel mix.  (My technique then is to immediately pull the blank half of the tortilla over the un-melted filling and then turn it over in the pan.  This way, the cheese will then melt down into the ingredients on the inside.  Neat huh?)
  • Allow this to cook about 3-5 minutes so the tortilla crisps in the pan.  Check occasionally - when you see it beginning to darken/toast just a little, flip back to the first side and repeat until that side is toasted.  Remove to a cutting board, slice, and serve.


Sunday, November 13, 2011

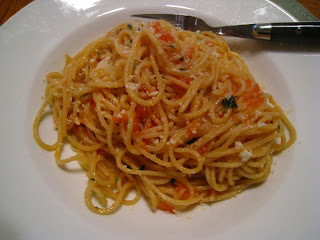
Pasta Filletto di Pomodoro


Pasta Filletto di Pomodoro (a.k.a Pasta with filleted tomatoes) is an easy to make, light pasta recipe that's ready in no time.  The cool part about this dish (which is a version of master Italian chef, Nick Stellino's) is that you can prepare the few portions needed for this recipe ahead of time so you're not rushing to do it all last minute.

I believe that the key to this recipe is the preparation of the tomatoes.  You can certainly just dice some romas or any other tomato for this, but you'll definitely notice a difference in texture and flavor by doing this the correct way - which is to eliminate the skin and seeds by boiling your tomatoes for about 30 seconds ahead of time.  (...we'll get to that in the recipe though).

One thing I have learned about cooking Italian pastas like these in recent years is that you really need to understand the importance of the correct cheese to utlilize.  I don't know about anyone else, but it took me a while to really appreciate freshly grated or shredded parmesan reggiano, romano, mozzarella, and other Italian based cheeses.  Some have a very distinct scent to them (which can be unappealing for many), but they really do encompass true Italian flavor/texture and they just require a slight palate adjustment to appreciate them.  I assure you, there's a world of difference when you grate/shred whole cheese as opposed to purchasing the pre-bagged kinds, which tend have a bit more of a rubbery texture.

That being said...let's make some pasta.


Pasta Filleto di Pomodoro:

Ingredients:
  • 1/2 # Spaghetti Noodles
  • Olive Oil
  • 2 Tsp Salt (for the pasta water)
  • 4-5 Garlic Cloves, Sliced
  • 1/8 Tsp. Red Pepper Flakes (Optional)
  • 1 Tbsp. Fresh Basil, Chopped
  • 3 Large Tomatoes (or 6 Roma Tomatoes)
  • 2 Tsp. Salt
  • 1 Tsp. Sugar
  • 2 Tbsp. Freshly Grated Romano Cheese (and a little extra to garnish at the end)

How To Make:
  • To begin with, bring a large pot of water to a boil and add the salt for the pasta.  Stir noodles over a rolling boil for about 6 minutes until "al dente".  Strain noodles and place in a medium bowl.  Pour about 1 Tbsp. of Olive Oil over the noodles - just enough to coat -  toss together so they won't stick & set aside for later. 
  • Bring another medium/large of water to a boil.  While the water is heating up, make a small cross or "X" on the bottom of each tomato; these will give you easy-to-access flaps after they are boiled so you can peel it quicker.  Submerge the tomatoes in the water and boil for approximately 30 seconds; if you go too long, your tomatoes will mush up.  Remove to a bowl and let cool enough that you can handle them.
  • Once the tomatoes have cooled, peel the skin off completely, and quarter the tomatoes.  Then you want to "fillet" the tomato to remove the chewy membrane and seeds, just leaving the meaty portion of the tomato.  This should be about 1/4 thick if fully ripe.  Dice the tomato and set aside.
  • Alright folks, it's the home stretch:  Pour enough Olive Oil to completely coat the bottom of a medium saute' pan and add the garlic slices, THEN turn the pan to medium heat.  This is done to infuse the oil the with the garlic flavor.  As soon as the garlic begins to crackle (takes a couple minutes), add the pepper flakes and the basil and stir briefly.  The basil will IMMEDIATELY crackle when it hits the oil as it is made up of mostly water.
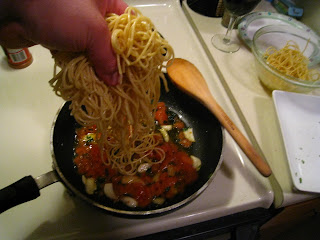
  • Pour in the tomatoes, sprinkle with the salt and pepper and stir to combine.  Add your spaghetti and toss with tongs (or a few flips of the wrist if you have that technique down) until all the ingredients have had the chance to dance with one another.  Yep...I said that.
  • Last step: Turn the heat OFF and then sprinkle your cheese over the mixture.  You do this, so the cheese does not burn on the bottom of the pan while you're tossing the pasta.  Toss/stir to combine for about 1 minute and pour into serving bowls.  I prefer a chilled Chardonnay with this one. 


Wednesday, November 2, 2011

Puerco Pibil - A Slow Roasted Mexican Pork


Puerco Pibil is an insanely exotic dish that's a staple in the Yucatan Peninsula.  It's trademark color comes from the annatto seeds in the aciote paste.  If you've ever seen "Once Upon A Time In Mexico", you'll recognize this as the dish that Johnny Depp's character goes loco over.

I have to give credit to Robert Rodriguez for the recipe - it's one of the cool special features on the DVD for that movie where he does a video tutorial of making this dish.  I've been making this ever since I first saw it back in 2003. 

The annatto seeds I refer to above can be purchased in Mexican markets or purchased online.  They look like little rocks:


One other reason I truly enjoy this dish, is it requires about 20 minutes of preparation and then you throw it in the oven for 4 hours and you're done.  You have time to go about your day and do what you need to do while the meat steams itself to perfection. 

The last thing I'd like to point out is that traditional pibil involves wrapping the meat in banana leaves prior to cooking.   Since I don't have easy access to banana trees, I simply place the pork in a casserole dish and cover tightly with aluminum foil.   If you have a problem with that, take it up with me in the morning...I'm too tired to argue now.

Ooh....one more thing:  It is ideal if you have a coffee grinder that you can use for grinding spices. (Don't use one you use for grinding coffee...it's going to come out all yuck.)  If you don't, just take my measurements below from the bottled version of the spices.  Ok, now I'm done.


Puerco' Pibil

Ingredients:
  • 5# Pork Butt (Also known as Pork Shoulder)
  • 5 Tbsp. Annato Seeds
  • 2 Tsp. Cumin Seeds
  • 1 Tbsp. Black Peppercorns
  • 8 Allspice
  • 1/2 Tsp. Cloves
  • 2-3 Habanero Peppers, Seeded and chopped
  • 1/2 Cup Orange Juice
  • 1/2 Cup White Vinegar
  • 2 Tbsp. Kosher Salt
  • 8 Cloves Garlic, Minced
  • Juice of 5 Lemons
  • A splash of your favorite Tequilla - Don't skimp, use the good stuff

How To Make:
  • Place the annato seeds, cumin, pepper, allspice, and cloves in your grinder and grind until they're small granules.  Set aside.  In a blender, combine habanero, orange juice, & vinegar and blend briefly (5-8 seconds).  Add the ground spices, salt, garlic, lemon juice and tequilla and blend until smooth - about 30 seconds.
  • Cut the pork into 2" cubes and place in a large ziploc bag.  Pour the marinade over the meat, seal the bag, and shake/move so the mixture covers the meat thoroughly.  Preheat the oven to 325.
  • Line a large casserole dish with a few sheets of aluminum foil and pour the meat into the dish.  Cover entire contents with foil and make sure there are no air holes - the steam is what cooks the meat properly.  Cook 4 hours and serve over rice.


Sunday, October 16, 2011

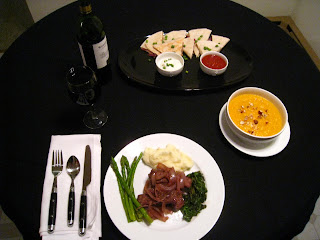
Bistro Day At Grigal's Palace - Entree: Red Wine Braised Beef Ribs with Balsamic Kale & Silky Yukon Spuds


Long story short, I felt I owed it to myself to enjoy a full evening of tasty, and only somewhat sophisticated food.  This was the perfect ending to not only a cool, fall day but also a perfect ending to a loooong work week.  It's a great little menu if you want to do something nice for someone special too.  I'm special....so I made this for me. 

This was my entree for the evening.  The other courses and their recipes will follow in subsequent blogs making it easier to reference.  As always, the key to a dish like this is to use a wine that you actually enjoy drinking because after it has simmered for 2 hours, that's 90% of your flavor.  I love a dry Merlot so that was my wine of choice for this. 

When making this meal, you'll want to start the potatoes about 45 minutes before the ribs are done and save the last 10 minutes for the kale and asparagus.....or you can do what you want and just ignore me.


Ingredients:
(Ribs)
  • 1# Boneless Beef Ribs
  • 1/4 Cup, All Purpose Flour
  • 1/2 Yellow Onion, Sliced
  • 1 Large Garlic Clove (or 2 smaller ones), Chopped
  • 3/4 Cup Red Wine
  • 1 Can, Beef Broth
  • 1 Tbsp. Olive Oil
  • 1 Tbsp. Butter
  • Salt and Pepper

How To Make:
  • Pour the flour into a shallow dish or plate.   Season the ribs with salt and pepper and dredge in the flour - shaking off any excess - and set aside.  In a medium saute' pan, heat the butter and olive oil over medium heat until the butter is melted.  Swirl the pan to coat it well and lay the ribs down, leaving a little space between them to cook evenly.  Brown for 4 minutes on each side to sear in the juices and remove to a platter.
  • Add the onions and garlic to the pan and stir to incorporate.  Cook, stirring occasionally for about 4-5 minutes until the onions start to turn translucent.  Add the wine. If you're using a stainless steel pan, scrape the bottom to get all the bits of flavor off.  If using non-stick, just add the wine and simmer 3 minutes. 
  • Pour the beef broth into the mix and simmer 2 more minutes.  Place the ribs into pan, spoon some of the sauce over them, turn the heat to low, cover and simmer 2 hours.  Serve with (or over) your favorite potatoes or even cooked egg noodles.  I chose my silky Yukon spuds, blanched asparagus and balsamic sauteed kale.


The Full Spread....


Saturday, October 15, 2011

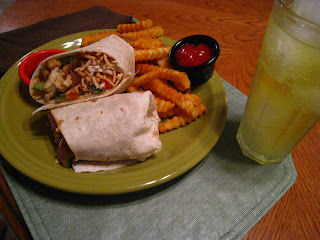
Asian Influenced Cashew Chicken Wraps


I am pretty sure one of my friends sold me out years ago.  I have been making this wrap for a long time but within about a year of me making it for people, I found something eerily similar added to the "New Items" section on Applebee's menu.  Therefore, the only logical explanation is that one of my friends gave my concept to the chef's responsible for creating menu selections for that chain.  I was going to sue the company, but I really enjoy their Bruschetta Chicken Pasta so it would be a shame to bring them to their knees.  (...I suppose I can work on my own version of that one next...)

I love these things.  I have always been a "wrap" kind of guy and am always looking for different ways to create new combinations.  Up to that point, I hadn't seen any "Asian-style" wraps in restaurants so I thought I was being quite innovative.  It is ridiculously easy and full of flavor plus I love the crunch you get from the cashews and chow mein noodles.  Give this sucker a try...

P.S. You may notice in my pictures that I am wearing 2 different color shirts.  If you must know, I inadvertantly knocked a wooden spoon off one of the pans and it flew back at me, richocheting off my chest.....the spoon was covered with sauce....


Cashew Chicken Wraps


Ingredients:
  • 1 cup Red Onion, sliced
  • 1 cup Red Pepper, sliced
  • 1 cup Mushrooms, sliced
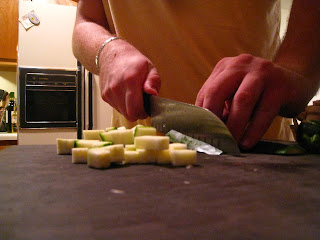
  • 1 cup Zucchinni, diced
  • 1# Chicken Breast, sliced
  • 3/4 Cup, Cashew Slices (Plus more for sprinkling at the end)
  • 1 Tbsp. Chili Garlic Sauce
  • 1 Tbsp. Teriyaki Sauce
  • 1/2 Tbsp. Hoisin Sauce
  • Chow Mein Noodles
  • 6 Grande Tortilla Shells

How To Make:
  • Season the chicken with just a little salt and pepper.  In a medium saute' pan, begin to brown the chicken over medium heat until just cooked through.  In a second, larger saute pan, heat about 1-2 Tbsp. olive oil over medium heat.  Add the onions, peppers, zucchinni and mushrooms.  Stir and cook 3-4 minutes until onions just start turning translucent.  Add the cashews and cook another minute or 2 - just to let the flavors combine.  Add an extra shot of oil if the mix appears too dry.
  • While vegetables are cooking, combine the chili garlic sauce, teriyaki, and hoisin in a small bowl and stir to incorporate.  Add the chicken and the sauce to the vegetables and turn heat to low.  Simmer 3-4 minutes until heated through and coated evenly.
  • If your tortilla shells aren't at room temperature already, toss each in the microwave for 15 seconds just to soften and make pliable.  Spoon about 3/4 cup of the mixture into center of the tortilla. Sprinkle a few more cashews and some of the chow mein noodles over the the mix. Pull the bottom edge of the tortilla over the mix and flip over.  Fold in sides and flip again - rolling until tightly formed.  Continue with remaining shells.  (See pictures below for folding technique).
  • These taste really good by themselves, but if you're looking to dip them in something, I recommend either a sweet teriyaki dipping sauce or Franks' Sweet Chili sauce.