Sunday, October 16, 2011

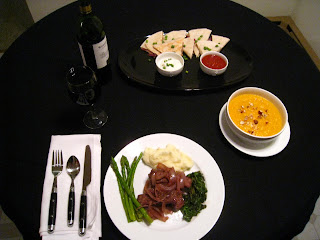
Bistro Day At Grigal's Palace - Entree: Red Wine Braised Beef Ribs with Balsamic Kale & Silky Yukon Spuds


Long story short, I felt I owed it to myself to enjoy a full evening of tasty, and only somewhat sophisticated food.  This was the perfect ending to not only a cool, fall day but also a perfect ending to a loooong work week.  It's a great little menu if you want to do something nice for someone special too.  I'm special....so I made this for me. 

This was my entree for the evening.  The other courses and their recipes will follow in subsequent blogs making it easier to reference.  As always, the key to a dish like this is to use a wine that you actually enjoy drinking because after it has simmered for 2 hours, that's 90% of your flavor.  I love a dry Merlot so that was my wine of choice for this. 

When making this meal, you'll want to start the potatoes about 45 minutes before the ribs are done and save the last 10 minutes for the kale and asparagus.....or you can do what you want and just ignore me.


Ingredients:
(Ribs)
  • 1# Boneless Beef Ribs
  • 1/4 Cup, All Purpose Flour
  • 1/2 Yellow Onion, Sliced
  • 1 Large Garlic Clove (or 2 smaller ones), Chopped
  • 3/4 Cup Red Wine
  • 1 Can, Beef Broth
  • 1 Tbsp. Olive Oil
  • 1 Tbsp. Butter
  • Salt and Pepper

How To Make:
  • Pour the flour into a shallow dish or plate.   Season the ribs with salt and pepper and dredge in the flour - shaking off any excess - and set aside.  In a medium saute' pan, heat the butter and olive oil over medium heat until the butter is melted.  Swirl the pan to coat it well and lay the ribs down, leaving a little space between them to cook evenly.  Brown for 4 minutes on each side to sear in the juices and remove to a platter.
  • Add the onions and garlic to the pan and stir to incorporate.  Cook, stirring occasionally for about 4-5 minutes until the onions start to turn translucent.  Add the wine. If you're using a stainless steel pan, scrape the bottom to get all the bits of flavor off.  If using non-stick, just add the wine and simmer 3 minutes. 
  • Pour the beef broth into the mix and simmer 2 more minutes.  Place the ribs into pan, spoon some of the sauce over them, turn the heat to low, cover and simmer 2 hours.  Serve with (or over) your favorite potatoes or even cooked egg noodles.  I chose my silky Yukon spuds, blanched asparagus and balsamic sauteed kale.


The Full Spread....


Saturday, October 15, 2011

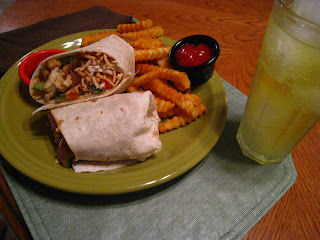
Asian Influenced Cashew Chicken Wraps


I am pretty sure one of my friends sold me out years ago.  I have been making this wrap for a long time but within about a year of me making it for people, I found something eerily similar added to the "New Items" section on Applebee's menu.  Therefore, the only logical explanation is that one of my friends gave my concept to the chef's responsible for creating menu selections for that chain.  I was going to sue the company, but I really enjoy their Bruschetta Chicken Pasta so it would be a shame to bring them to their knees.  (...I suppose I can work on my own version of that one next...)

I love these things.  I have always been a "wrap" kind of guy and am always looking for different ways to create new combinations.  Up to that point, I hadn't seen any "Asian-style" wraps in restaurants so I thought I was being quite innovative.  It is ridiculously easy and full of flavor plus I love the crunch you get from the cashews and chow mein noodles.  Give this sucker a try...

P.S. You may notice in my pictures that I am wearing 2 different color shirts.  If you must know, I inadvertantly knocked a wooden spoon off one of the pans and it flew back at me, richocheting off my chest.....the spoon was covered with sauce....


Cashew Chicken Wraps


Ingredients:
  • 1 cup Red Onion, sliced
  • 1 cup Red Pepper, sliced
  • 1 cup Mushrooms, sliced
  • 1 cup Zucchinni, diced
  • 1# Chicken Breast, sliced
  • 3/4 Cup, Cashew Slices (Plus more for sprinkling at the end)
  • 1 Tbsp. Chili Garlic Sauce
  • 1 Tbsp. Teriyaki Sauce
  • 1/2 Tbsp. Hoisin Sauce
  • Chow Mein Noodles
  • 6 Grande Tortilla Shells

How To Make:
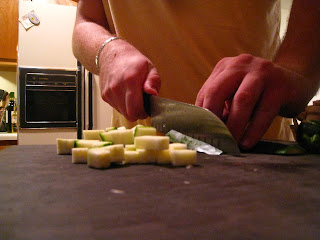
  • Season the chicken with just a little salt and pepper.  In a medium saute' pan, begin to brown the chicken over medium heat until just cooked through.  In a second, larger saute pan, heat about 1-2 Tbsp. olive oil over medium heat.  Add the onions, peppers, zucchinni and mushrooms.  Stir and cook 3-4 minutes until onions just start turning translucent.  Add the cashews and cook another minute or 2 - just to let the flavors combine.  Add an extra shot of oil if the mix appears too dry.
  • While vegetables are cooking, combine the chili garlic sauce, teriyaki, and hoisin in a small bowl and stir to incorporate.  Add the chicken and the sauce to the vegetables and turn heat to low.  Simmer 3-4 minutes until heated through and coated evenly.
  • If your tortilla shells aren't at room temperature already, toss each in the microwave for 15 seconds just to soften and make pliable.  Spoon about 3/4 cup of the mixture into center of the tortilla. Sprinkle a few more cashews and some of the chow mein noodles over the the mix. Pull the bottom edge of the tortilla over the mix and flip over.  Fold in sides and flip again - rolling until tightly formed.  Continue with remaining shells.  (See pictures below for folding technique).
  • These taste really good by themselves, but if you're looking to dip them in something, I recommend either a sweet teriyaki dipping sauce or Franks' Sweet Chili sauce.


Saturday, October 8, 2011

Shredded BBQ Chicken Sandwich & A trip to the Twin Cities


I think it's funny when people do stupid things.  I have to be in the top 10 of all time for people that do stupid things.  This week, I did 2 very stupid things.  I'm going to let you in on one of them, but I'm keeping the 2nd to myself for now.  If you're really that curious, ask me about it some time.  If I'm feeling froggy....maybe I'll jump.

I had the opportunity to be in the Twin Cities this week for a business trip and was quite lucky to connect with some co-workers for a tremendous dinner party at my friends' house.  (Btw Earl, I have to get the secret to your kale...it was amazing).  Back to stupidity...

I had thoroughly enjoyed my meal and as much as I would have liked to stay for another few hours to visit, I was exhausted since I had driven the 3+ hours to the cities and had gone straight to his house.  After convincing Chris and Heather it was time to leave (I had no idea where the hell I was and needed to follow them back to the freeway), we headed for the door. 

I have a really stupid, but cool-looking pair of dress shoes.  I say "stupid" because I swear the laces tighten themselves when they are off my feet resulting in a ten minute fight to get into them.  As we prepared to leave, I realized I didn't have the energy to fight with these things tonight....enter stupid thing I did #1 this week:  I pushed my feet into them as though they were slip-ons for some reason and pretended to lace them up, even though I could feel the back of my shoes getting crushed under my heels.  This shouldn't have been a big deal, except I am 99% sure Marcus saw this and probably wondered what kind of an idiot I really was.

I awkwardly shuffled to my truck and got inside. As I waited for the convoy to pull away, I reached down and attempted to maneuver the heels back in place, but we started to leave.  I was staying with another friend of mine down in Rosemount for this trip (thanks again Colin) so I knew I had a good 45 minutes to get these things on right.  One of the most uncomfortable feelings is shoes not properly on your feet.

Once we reached the freeway, I finally got half of my first foot in the shoe.  After a flurry of swears, followed by my chest leaning in on the horn and my forearm turning on my high beams (sorry about that Chris), it popped into place.  I was not looking forward to trying my right foot as I needed that to accelerate, but I knew I needed to.  I flipped on the cruise control and fought with that damn shoe until it FINALLY popped on the 2nd foot..................1 block from Colin's house.

I pulled into his driveway and turned off the ignition.  I sat there for a moment before opening my door.  When the cargo lamp turned on, I swung my legs out and gracefully tied both shoes.   I walked the 20 feet to his front door, stepped inside and unlaced my shoes for the evening.   I have my pride...


Shredded BBQ Chicken Sandwich w/Homemade K.C. Slather Sauce

Ingredients:
  • 2 large (or 3 medium) Chicken Breasts
  • Kaiser Rolls or Sesame Seed Buns
  • 1 bottle of your favorite BBQ Sauce OR follow directions below for one of my favorites from scratch.  (*Author's note:  There are hundreds of types of BBQ sauce, and we're not going to go into the details of the variations by region in this blog.  However, Kansas City is known for a sweeter, tomato-based sauce which I personally prefer so after many attempts, I have perfected this to my own taste.  Feel free to experiement and adjust, but this is JUST the way I like this sauce:  thin and sweet).
How To Make:
  • I prefer to grill the chicken outdoors with charcoal and wood chips to give it that necessary BBQ/Smoky flavor, but you can absolutely pan sear or roast your chicken breasts in the oven until nearly cooked - - they will finish in the pan with the sauce.  If you're going with the grill, soak your preferred wood chips (I use applewood) at least 1 hour ahead of time in a grill pan or large bowl filled with water.
  • When coals are ready, season your chicken with salt and pepper on both sides.  Oil the grill grates with a paper towel dipped in vegetable oil and place the chicken over direct heat for 2 minutes.  Turn 45 degrees and cook over the direct heat for another 2 minutes to achieve cross-hatches.  (You might ask, "Why go for cross hatches if it's just going to be torn apart?"  Answer:  "Pride in worksmanship."
  • Flip chicken over and continue to cook over direct heat for 4 more minutes to help sear in juices.  Move chicken to indirect heat and allow to cook/smoke for 12-14 minutes.  Remove from grill and set on a plate for 5 minutes to settle.
  • When chicken has cooled slightly, tear apart with hands or forks and place in a large bowl.  Keep in mind, it's ok if the chicken is still a little pink, you're going to finish cooking it in the saucepan shortly.  Add about 3/4 of your BBQ sauce to a medium saucepan and add the chicken over medium heat - reserving the rest of your sauce to pour on top of the sandwich when serving.  Stir for 5-7 minutes until heated through and plate on your choice of bun.  Serve with fries, beans, corn on the cob, or coleslaw and an Iced Tea or Ice Cold Beer.


Grigal's KC Sweet Slather Sauce:

Ingredients:
(Looks intimadting due to the number of ingredients, but it's so easy and it only takes minutes to put together....really.)
  • 1-28oz Can Whole Peeled Tomatoes
  • 2 Tbsp. Vegetable Oil
  • 1-Medium Yellow Onion, Diced
  • 4 Cloves Garlic, Chopped
  • 5-6 Tbsp. Honey (Start with five and taste for sweetness.  Add more if desired while cooking)
  • 4 Tbsp. Worcestershire Sauce
  • 4 Tbsp. Apple Cider Vinegar
  • 1 1/ 2 Tbsp. Soy Sauce
  • 1 Tbsp. Molasses
  • 2 Tsp. Chili Powder
  • 2 Tsp. Ground Mustard
  • 1 Tsp. Cayanne Pepper (Add more to taste if you want it spicier).
  • 1/2 Tsp. Cinnamon
  • 1/2 Tsp. Paprika
How To Make:
  • In a medium saucepan over medium heat, saute' the onions and garlic in the vegetable oil until translucent - approximately 5-7 minutes.  When vegetables are nearly finishing up, pour the tomatoes into a blender and blend until smooth - about 1 minute.  Add tomatoes to sauce pan and stir.
  • Add remaining ingredients and stir over low heat for 2-3 minutes.  Transfer mix back to the blender, cover with a towel and carefully pulse every few seconds, occasionally lifting the lid to vent, until vegetables are blended -- about 30 seconds to 1 minute.
  • Pour back into sauce pan, bring to a soft boil, reduce heat and simmer for 25 minutes.  Remove from heat and allow to cool.  (You can still use this hot, but if you wait to cool, it can take 1-2 hours).  Use as directed above and/or transfer to condiment bottles for pouring onto dish later.  Will stay fresh in refrigerator up to 3 months.


Saturday, October 1, 2011

Dinner For Two: Elegant and Easy Spaghetti & Breadsticks


(As with the last couple posts, this looks longer, but it's because I added a number of pictures while I was preparing.  I have been receiving a lot of feedback that the pictures actually help to illustrate the recipes, so I've kept them.)

I have been getting a number of emails and facebook messages from those of you who are reading this and I'd like to thank you for that.  Additionally, in some of those emails, people are actually starting to ask me how to make "this" or if I could do a blog on making "that".  Now I'll be honest, I don't know how to make half of the shit you guys are asking for, but I appreciate the confidence you have in my abilitity.  It does give me some goals to shoot for though...

That being said, I did get a question/request from a friend on how to make a simple spaghetti dish so she wouldn't have to buy it in a box and/or jar.  Now when it comes down to it, everyone and their mother's brother has "The Best Spaghetti/Marinara Sauce" recipe (actually, Marinara is technically incorrect, but we'll get to that another time) and that's totally fine, go ahead and use it.  Me, I like this one because it's extremely flavorful, SUPER simple, but also just complicated enough that it feels cool to make.  Make this for someone special and chances are, they'll notice it tastes better than normal. 


Before I begin, there are 3 things to keep in mind:
  1. You'll notice my recipe calls for "2" bottles of wine.  Now, one of them is optional to not only add to the sauce if you like, but it can also be served with the meal at the end.  The SECOND bottle is NOT optional, as this is what you drink while you're cooking.  This is your fuel.
  2. You need good music in the background while you cook.  Music and wine were created to be a key element in Italian cooking.  My choice for tonight is "Smooth Grooves" - a tremendous Jazz instrumental collection.  (If you read my other blog about my last run-in with music and cooking, let me reassure you that I can already tell my neighbors are going to get another poignant look at the Dancing Dweeb next door tonight.)
  3. Get yourself an apron.  It's inevitable that once your sauce starts to "blorp" (word I made up to describe the sound it makes when those deep bubbles begin to surface from within the sauce.) you're going to get blowback and you don't want to ruin a good shirt.  In case you think I don't take my own rules seriously:

     
Yes..that's a Three Stooges apron...

If you're making this for someone, go the extra mile with the little things:  keep your soft music playing in the background, ensure you have plenty of wine (or grape juice if they don't like alcohol), candles are always a nice touch, a little wicker basket to serve the breadsticks in can be purchased for about 5 bucks at Target, and don't forget to save some of your chopped herbs for garnish just before serving.  Geez...I am so romantic.  If I wasn't already myself, I'd ask me to marry me.  Now let's get cooking...


Elegant Spaghetti & Marinara

Ingredients:
  • 2 Bottles-Red Wine.  I prefer a room temperature Merlot.  (Save a bottle for serving with dinner.)
(Red Sauce - "Marinara")
  • 1-28oz. Can of Whole Tomatoes (Spend the extra buck, and get the best on the shelf.  Trust me.)
  • 1-6oz. Can of Tomato Paste
  • 4 Cloves Garlic, Chopped
  • 1/4 Cup Fresh Basil, hand torn
  • 2 Tbsp - Fresh Parsley, chopped
  • 1 1/2 Tsp. Oregano
  • 1 Tsp. Sugar (Blasphemy!  I know, traditional red sauces use diced carrot for their sugars to counter-act the acid of the tomatoes, but I don't have a food mill and neither do most people, so sugar will do.  You don't like it?   Go buy one of Batali's cookbooks...)
  • About 1/4 Cup of the wine you should be drinking while making this.  (*Optional)
  • Blender
  • Extra Virgin Olive Oil
  • 1/2 Tsp. Red Pepper Flakes (Optional, but it gives the pasta just a hint of a kick.  Awesome.)
  • 1# Spaghetti Noodles
  • Kosher or Sea Salt (For the pasta water)
How To Make:
  • Open your can of whole tomatoes and DON'T drain the water.  Instead, dump the entire contents into your blender.  Blend on low until completely smooth - about 30-40 seconds.  Leave in blender and then chop your garlic.
  • (Here's one secret I use for awesome flavor) Pour enough olive oil to coat the bottom of a medium saucepan and add the garlic - THEN bring heat up to medium-low.  By doing this, you are infusing the garlic flavor with the oil and it pays off tenfold.  Allow garlic and oil to warm up about 3-4 minutes.  Don't go more than 5, or the garlic will burn and leave you with a bitter tasting sauce.  If you're using the wine to cook with, add it now.
  • When garlic is ready, add the blended tomatoes, tomato paste, parsley, oregano, and sugar and stir.  Take your basil, and tear off bits about 1/4"-1/2" thick and add directly to the sauce - reserving a leaf or two to garnish at the end.  Stir over medium heat until it "blorps" - about 8-10 minutes.  Reduce heat to low and simmer 25-30 minutes.
    • *Why "hand-tear" as opposed to chop?  Chopping basil actually bruises the leaves.  You get the licorice-type taste, but it begins to lose it's aromatic properties.
  • Begin to bring a large stock pot of water up to a boil for the noodles.  When the water starts boiling, dump a good handful of salt into it.  This is your only opportunity to season the pasta - if you don't, you're left with a bland tasting noodle under an impressive red sauce.  Keep your pasta whole if you like wrapping it around your fork and add it to the water.  Reduce heat just a touch and stir - boiling 6 minutes.  (It'll finish in the saute' pan....yes...the saute pan:  secret #2 about this dish.)
  • When pasta is done, drain but don't rinse - leave in the colander.  Then pour about 2 Tbsp. olive oil into a medium saucepan along with the red pepper flakes and heat over medium for 1 minute.   Add the pasta and stir until it's well combined.  Add about 1 cup of the red sauce and stir in the pan for about 1 more minute until well combined.  Pour into serving dish and garnish with remaining chopped parsley and basil leaves.  It is so worth the effort...


=====================================================================


Garlic-Butter Breadsticks

Ingredients:
  • 3 1/2 Cups All Purpose Flour
  • 1 1/2 Cups Warm Water (Not hot, not cold)
  • 1 Tbsp. Sugar
  • 1 Tbsp. Active Dry Yeast
  • 1/2 Tsp. Salt
  • 2 Tbsp. Butter
  • 1/2 Tsp. Garlic Powder
  • 1 Tsp. Vegetable or Canola Oil
How To Make:
  • Combine the yeast, water, and sugar in a large bowl.  Stir quickly and allow to sit for 10 minutes so the yeast can do it's thing.  When the the ten minutes are up, begin to slowly add the flour, 1/2 cup at a time - stirring to combine.  Once all flour is combined, use your hands (if necessary) to smooth out the dough into a ball - it might be a little sticky, that's ok.
  • Pour about 1 Tsp. of the oil into a medium bowl and smear it with your hands to cover the sides.  Add the dough and cover.  Allow to rise 50 minutes.
  • When dough has risen, pour it out onto a slightly floured surface.  Add a sprinkle of flour to the top of the dough and roll out with a rolling pin to make somewhat of a rectangle.  With a pizza cutter, slice even strips up the length of the dough to make 12-16 evenly sized strips.  Pull strips apart and twist in opposite directions with your fingers to add a bit of a twirl to the dough.
  • Spray your cookie sheets with cooking spray and add your strips, doing your best to space them so they don't touch.  Cover again and allow to rise 35 minutes.  During the last 10 minutes of rising, preheat your oven to 425.
  • When oven is preheated, add the breadsticks to it and allow to cook 10-12 minutes until risen and golden.  While breadsticks are cooking, place your butter in a microwave safe bowl and melt (about 20-25 seconds).  Sprinkle your garlic powder in and stir to combine.  When breadsticks are done, brush them with with the garlic butter immediately and prepare to serve.